Promotion Items

the KILN @Indiegogo
4hr Courses

Dear Friends, Guitaring Passionately has began its inaugural acoustic guitar making process in early 2017. Do stay tuned to the progress thru instagram and Facebook.

Check out our Price Busters

Learn practical guitar maintenance skills in our 4hr Courses. Brochure Download here

Monday, July 13, 2015

Bite Size Tips 005 – Spot Finish Restoration

Hi Guitar Enthusiasts, it has been a while since the last edition of Bite Size Tips. In this one, I shall feature a very popular topic, restoring dents and nicks on guitar finishing.

Every guitar gets dents or nicks in its useful life. It is almost inevitable. But remember, perfection itself is about having wisdom to embrace imperfections. Hence restoring such dents or nicks is never about getting the original (once brand new) state but to improve it and above all to engage our minds and hands to solve an issue.

Many guitar enthusiasts got fixated to the assumption of reverting their guitars to original state. That will bring nothing good for a person because doing the impossible will only end in agony and frustrations.

In this edition, I will attempt to explain the means which I undertake restoration works for dented finishing on guitars.

Dents on Top Board
The first picture showed an acoustic guitar with dents on it top board. Definitely not a welcoming sight to guitar lovers. Instead of thinking about approaches to repair the dents, many guitar lovers fell into a common thinking trap of wanting to get rid of the dent totally. With that inaccurate thinking, it will almost surely lead to a frustrating ending.

Let begin with understanding the damage in greater details. Guitar top boards consist of wood and its finishing, a.k.a. lacquer. In the first picture, those dents have surely affected both. What matters is deciding what to repair. The wood, lacquer or both?

In FRETS.COM, repairing wood dents are explained in details by Frank Ford, one of the masters for guitar repairs. If you are interested do visit the website for a good read.

Wood is malleable, that means it can be compressed, eventually altering in its shape. Most methods used for restoring wood dents are exploratory and nothing is certain. Mine is no exception as well. I shall focus on touching up the dented finish.

The knowledge base of finishing is vast and deep. It will take a long article to cover them. Hence it wasn't feasible to explain all these related information.

So let's to work. In this case, only a spot received the repair attention, I shall call it Spot Finish Restoration.

Assuming you know the type of finish is on the guitar to be repaired. Always use the same type of finish for filling work. While all clear lacquer look alike, they do share their differences. In restoring finishing, we want to avoid having adhesion problems because of their different chemical make-up.

First step - fill up the dent(s) with sufficient lacquer. If multiple coats are required, allow each coat to set before the next is applied. Make sure the filling covers the dent(s) in both depth and area. Give sufficient time for the filling to set.

Drop fill to cover dent

Second step - remove any excessive filling with a prepared razor blade. Tape up a razor blade as shown in the picture. The razor blade is going to used as a scraper. We want to scrape away the excessive filling but don't want to scratch the top board. The goal is to get as much filling removed so that the filling is almost leveled to the top board's finish. However you will find it hard to achieve. Nevertheless, we wish to minimize inflicted more damages other than the existing dent(s) itself.

Prepared Razor Blade

Third step - Scrape the filling conscientiously with the prepared razor blade. Get the filling as level as possible. Do check the tape on the razor blade, make sure it didn't get slice through in the process. Visually inspect the process to prevent over-scraping. Stop when you are satisfy with the level of the filling.

Scraping Excessive Filling Away

Fourth step - wet sand the affected area with sand papers in graduation grits, begin with 400 and stop at 2000. In preparation for wet sanding, I soaked all the required sand papers in water prior to using them. Take cautious and do not over sand. A concave area can form or worse, the lacquer gets totally removed and leaving raw wood exposed. Both are bad for the guitar.

Wet Sanding

Fifth step - if the previous steps were done properly, this final step will be easy as a breeze. That is to buff the area to shine. Buffing requires a polishing agent and there many such products available in the market. For this, I have selected the Premium Polishing Compound from TurtleWax. For rubbing the compound onto the guitar, use micro fiber or lint free fabrics.

After Wet Sanding

Ready to be Buff

Buffing to Shine

Completed

Turtle Wax

In conclusion, it may not be perfect, there might be a patch that is visible under strong lighting. But it is better then leaving dent on the guitar.

Saturday, June 27, 2015

Featured Restoration - A Hole on TOP

Once in a blue moon, some interesting repair jobs will walk through my door. I call this one " A Hole on TOP." Both the repair process and the remuneration for the repair were equally interesting.

Ripped Top
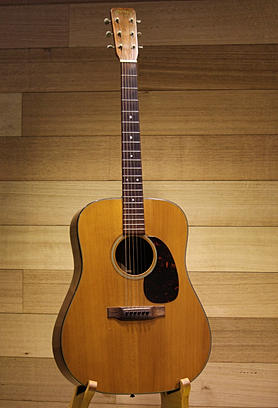
I received an email requesting for a repair job on a acoustic guitar. The owner has attached a picture (right) in the email for illustration.

When I seen it, I must say that I felt sorry for both the guitar and the owner. As you can see from the picture, the bridge of this guitar was completely ripped out of its footprint and part of its bridge plate has given as well. The owner has stowed this acoustic guitar within its case for… a pretty long time. So remember, play your guitars!

The owner has consulted other guitar repair techs but they have turned down his request. It was not surprising because this extent of damage required a lot of attention and effort. I think the other guitar techs didn't wish to spend too much time or effort so they simply use the most diplomatic response, "it can't be repaired."

That didn't discourage the owner to seek alternate opinions.

Most repair emails I have come across focuses on the cost of repair. This owner was more insightful which I later found out the reasons. He asked for my evaluation instead. It was an opened query, so I provided my inputs in these aspects, repair procedures, duration, possibilities and estimated cost.

I think he was delighted with my evaluation. In his email reply, he added a few more possible topics for me to ponder. On top of that, he suggested an interesting barter trade deal. Very uncommon in today's info-age.

He revealed his past experiences in making violins. It wasn't too hard for me to connect the ways he was evaluating my expertise and his experiences in wood working. As for my repair charges, it was a barter trade with his woods and tools. To a wood and tool junky like me, the offer was hard to ignore.

I was invited to drop by his place to check out his stuff. They are good stuff indeed and our barter trade was sealed. Cash isn't KING in everything, at least in this case.

The owner has been forthcoming in providing suggestions on how to reinforce the affected area so to prolong the lifespan of this guitar. I guess it was due to his experiences in violins making. The suggestions were also helpful in many ways.

Staring at the gaping hole, where should I start? In summary I have taken the following steps to repair it.

1. Inspect the guitar for other loose parts.
2. Remove existing bridge plate
3. Make a new rosewood bridge plate
4. Glue up all crack lines and delaminates found about the affected area
5. Reinforce through cracks with cleatings
6. Glue up new bridge plate
7. Make bridge footprint
8. Glue up the bridge footprint
9. Re-glue bridge
10. Re-drill bridge pin holes
11. Set up

Bridge Plate Removed
These steps were logical and pretty complete. But it didn't make it any easier.

I started with inspecting the guitar for other structural issues. Fortunately I didn't find any. So I went on to remove the leftover bridge plate that was still attached to the guitar top. It was easy for one half but the other was persistently stubborn.

A heated spatula was used however the spatula sliced into the thickness of the top plate and exited from the top. It was not something desirable however the show must go on. I persevered and the existing bridge plate relented eventually.

I went on the make a new bridge plate out of Rosewood. It has to be thicker and larger to take up string tension when the guitar gets set up later.

Many bridge plates were made with tow common considerations; conserving materials and light weight. For mass produced guitars, it was necessary to control material costs. Reduction to both thickness and size of bridge plates were the most logical approaches.

Bigger Bridge Plate
Likewise, I have two considerations as well but they were directly opposite. Jeffrey Yong has taught me to keep it big and weighty but not excessively heavy. So I made it filled up the apex space formed by the cross braces and stretching beyond footprint of the old bridge plate. You can see it from the picture.

So why did I go opposite? Jeffrey's perspectives about bridge plate were likened to the swing of pendulum. In order for a string to oscillate for a long time, a suitable weight must be added at the end. The top plate receives vibration from strings. As long as the top plate vibrates, sound is produced. It is then logical to find ways to prolong this vibration. With adequate inertia, the top plate should vibrate (oscillate) for a longer time. Hence the logic of having weighty bridge plate.

For guitar makers who maintain a light weight top plate, they do so because they believe that light top plates are more responsive. There are reasons that support this idea and equally there are as many reasons that would oppose it. It is not possible to ascertain which is a better approach because guitar making isn't a competition for the best. May the best ear decide.

Existing Cleat
The force which ripped the bridge out of the guitar has inflicted other damages to areas immediately around its bridge. Two crack lines that ran with the wood grain starting from both corners of the bridge were visible. These cracks can potentially grow longer as such they must not be permitted to propagate further.

From the picture on right, the existing cleat was exposed. That means repair work has been done on the area. Small portions of the top plate was lifted from the existing cleat and that has to be re-glued. A new cleat was needed to arrest the other crack. I made it from spruce and it has to be oriented cross grain to the top plate to maximize its holding effectiveness. The next few pictures showed progressively the steps needed to arrest that crack.


Crack lines arrested

Due to the extensive damages, certain repair jobs required clamping on the top plate. Inevitably clamping marks will be inflicted. The challenge was to minimize them. The next two procedures involved clamping on the top plate. The portions of the top plate that were sliced whilst removing the old bridge plate required re-gluing. It was time to re-glue the new bridge plate to close the gapping hole as well. Both jobs were carried out simultaneously.

Rosewood bridge plate clamped

The next job was a bit tricky. The ripping force has also torn away a portion of the top plate. It has taken the shape of the bridge's footprint. From the picture directly below, you can see the the new Rosewood bridge plate was exposed. In order for the bridge to be seated properly, a layer of spruce is required to fill that foot print. I selected a small piece of Adirondack spruce and made it into the shape of the foot print, and also the same thickness as the top plate. The grains has to be parallel with the top plate. The next few pictures showed in steps the making and gluing of the spruce foot print.

Spruce Foot Print

Spruce Foor Print Clamped

Spruce Foot Print Glued

Most of the difficult jobs have been completed at this stage. I went on to give the guitar a good clean up and a light buff. Re-gluing of the bridge came after that.


I left the bridge clamped overnight and allowed the glue to cure for the next 24 hours. The moment of truth has arrived, to put strings on the guitar. After all, the guitar was in my shop because the bridge was ripped out. While I have done my level best to get the bridge back to where it was, I wouldn't rule out the possibility of it coming out again. I was very cautious as I tensioned each string.

Fortunately, the bridge held up. However it was indeed a short moment of anxiousness. The guitar was finally set up and it played well and sounded fine. Finally it is finished!

Guitar Set Up

The Bridge Glued


Thanks for reading this far!

Monday, February 16, 2015

The Lesson Beneath Neck Resetting - Part 2

Getting it right the first time doesn't mean you will get it right again.

Not long after getting my Gibson's neck done I got another opportunity to reset a vintage Martin D-18. It was built in the 60s. Back then, the fingerboard and bridge were made from Brazilian Rosewood. Those were the days, the Golden Era for acoustic guitars; only the best materials were used.

If you are keen to try some vintage guitars, you can find many in Heirlooms Music at Lichfield Road. Click here to view more pictures.

A1965 Martin D-18 available at Heirlooms Music


Taken from: http://static.wixstatic.com/media/4bb691_6ea9ef48112b422cacbbdd3e408d9849.jpg_srz_p_278_408_75_22_0.50_1.20_0.00_jpg_srz

Since I have done neck reset jobs, it was natural for me to use the same steps that work. However, this particular neck reset job has reduced my thoughts to an assumption.

Finally the vintage Martin arrived. The neck angle has indeed altered over years and age has taken its toll on playability. To maintain comfort playability, the saddle has been trimmed gradually until it has very little crown height protrusion over the bridge slot. As shown in the picture below, the saddle was almost flushed with the bridge.

Low Saddle Height

I carried out the same steps without missing a beat until… the neck just wouldn't relent. It remained unmovable despite my attempts to remove it.

These are the "same steps" I have carried out.
1. Removed 15th fret wire
2. Dislodged fingerboard from top
3. Drilled hole into the fingerboard at 15th fret slot
4. Retrofit a tube to a espresso machine to deliver steam
5. Built a jig for neck removal
See series of pictures below.


With step 1 to 5 done, how can anything go wrong? In fact the ordeal has started… in total I made 5 attempts to "steam-the-neck" and I got nowhere. In the process, the neck removal jig gave way, it was unthinkable…  I have repaired and reinforced the neck jig to such strength that it is capable to crush a guitar. See picture below.

Original Neck Jig

Reinforced Neck Jig

I was perplexed and confused by the outcome. It set me on a root cause seeking mode for weeks. Trawled the internet for answers, writing emails to my luthier buddies for advice, desperately modifying jigs and equipment, etc. Finally an advise from Elderly Instruments made the critical difference.

It was step 3 of the "same steps", drilling a hole at the 15th fret slot. Most neck reset tips found on internet mentioned this step. When drilled accurately, it allows steam to be delivered into the dovetail joint thus dislodging the neck from the body. However many sources didn't emphasize accuracy instead they merely mention it as one of the steps.

It was imperative to determine the dovetail joint position on the fingerboard accurately. Using a spatula, I move it under the dislodged fingerboard until it hit the dovetail. That gave me with reasonable accuracy the position of dovetail joint on the fingerboard. I marked the position with a masking tape. In this case, the dovetail joint was close to the 15th fret but not at it. Two holes were drilled to allow entry and exit of steam.

Determining dovetail joint
Taken from: http://farm3.static.flickr.com/2182/2353308000_253961505b.jpg

It took less than 5 minutes to see water exiting at the neck heel whilst steam was flow in and out of both drilled holes. That was the indication that the guitar neck was poised to be removed from its body. The neck removal jig did its job easily and finally.

Neck removed, with glue residue
Cleaned, adjusted, ready for re-gluing

The joint was cleaned up, neck angle was re-adjusted, the required shims were prepared, and the easy part was to glue the guitar neck back to its body.


After the neck has been reset, it was usual to check on fret level with respect to the adjusted neck angle. It wasn't unusual for some frets to buzz. So the fret wires were leveled. This job concluded with a new bone saddle and set up. A new saddle was necessary because the original saddle was too low in its crown height (see picture below).
Personally, it was a damn good lesson learned.


Thanks for reading!